

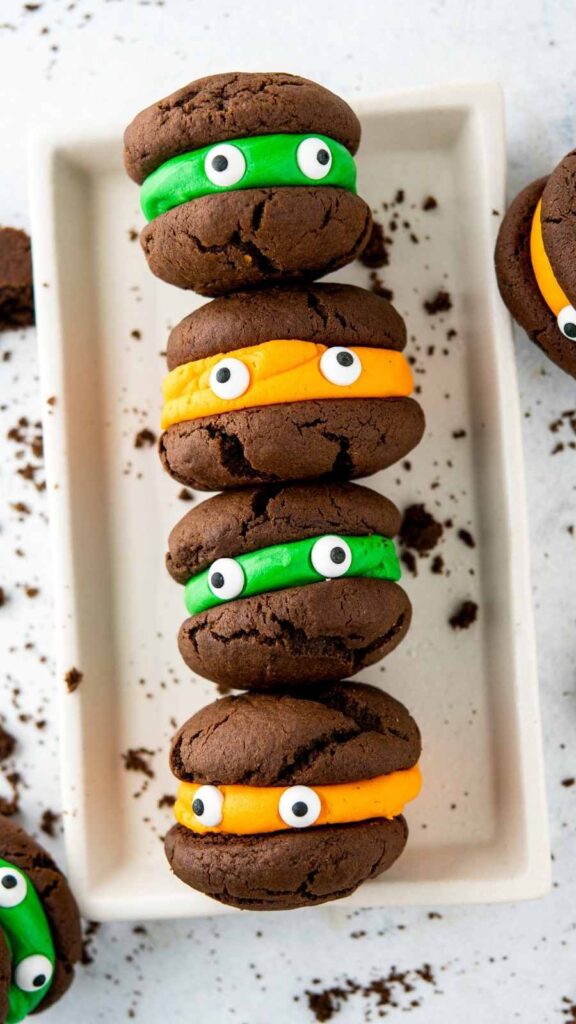
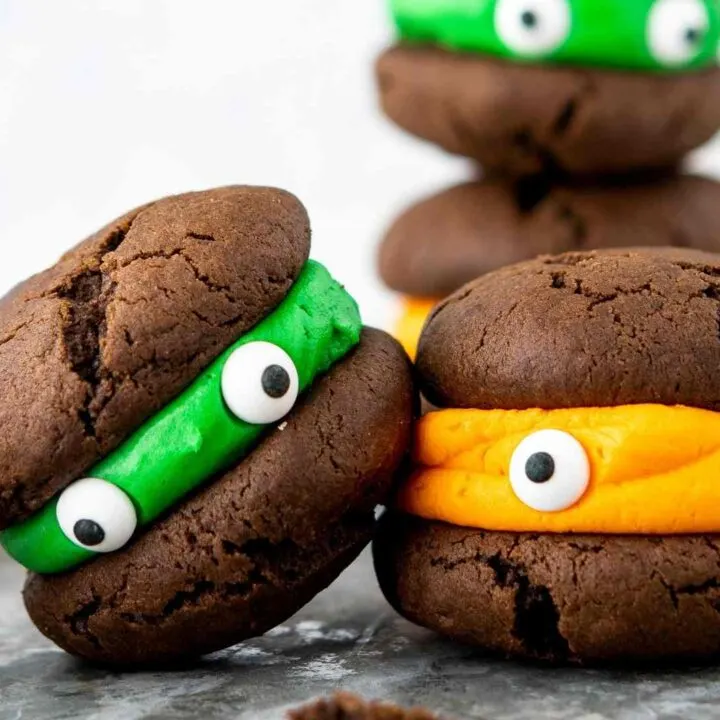
These Easy Halloween Cookies are delicious with brightly colored buttercream sandwiched between chunky chocolate cookies and with eye candies on front; I mean who can resist them?
These chocolate monster sandwich cookies are super cute, fun, and so easy to prepare which makes them a perfect spookalicious dessert for your Halloween party.
Plus, these cute cookies are tons of fun to make with your family, you can ask your children to assemble them and stick eyes on the front!

Monster Cookies for Halloween Parties!
Not only are these Easy Halloween Cookies super cute to make but they make a wonderful addition as Halloween Sandwich Cookies at the dessert table.
The buttercream icing can be swapped out of the other colors to fit your Halloween party theme or classroom party.
These Easy Halloween Cookies are easy enough to put together right before a party or to have them as an activity to put together themselves! Switch up the colors and have them ready to go in piping bags and let the kids have fun decorating with their favorite Halloween colors and eye candies.


RELATED: Chewy Thick Fudge Cookies
Ingredients in Chocolate Sandwich Halloween Cookies
- Unsalted Butter
- Granulated sugar
- Brown sugar
- Egg
- Vanilla extract
- Milk
- All-purpose flour
- Baking soda
- Baking powder
- Cocoa Powder
- Salt


Ingredients in Chocolate Sandwich Cookie Filling
- Unsalted Butter
- Powdered Sugar
- Vanilla Extract
- Orange and green gel food colors (or any other colors of your choice)
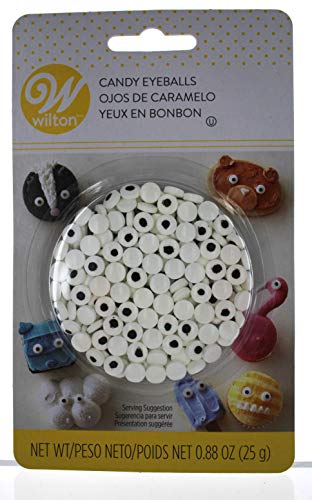
- Candy Eyeballs

RELATED: Sweet & Salty Halloween Snack Mix
How to Make Easy Halloween Cookies
It's easy to make this easy Halloween cookies recipe. The steps are simple and these spooky cookies are easy to assemble.
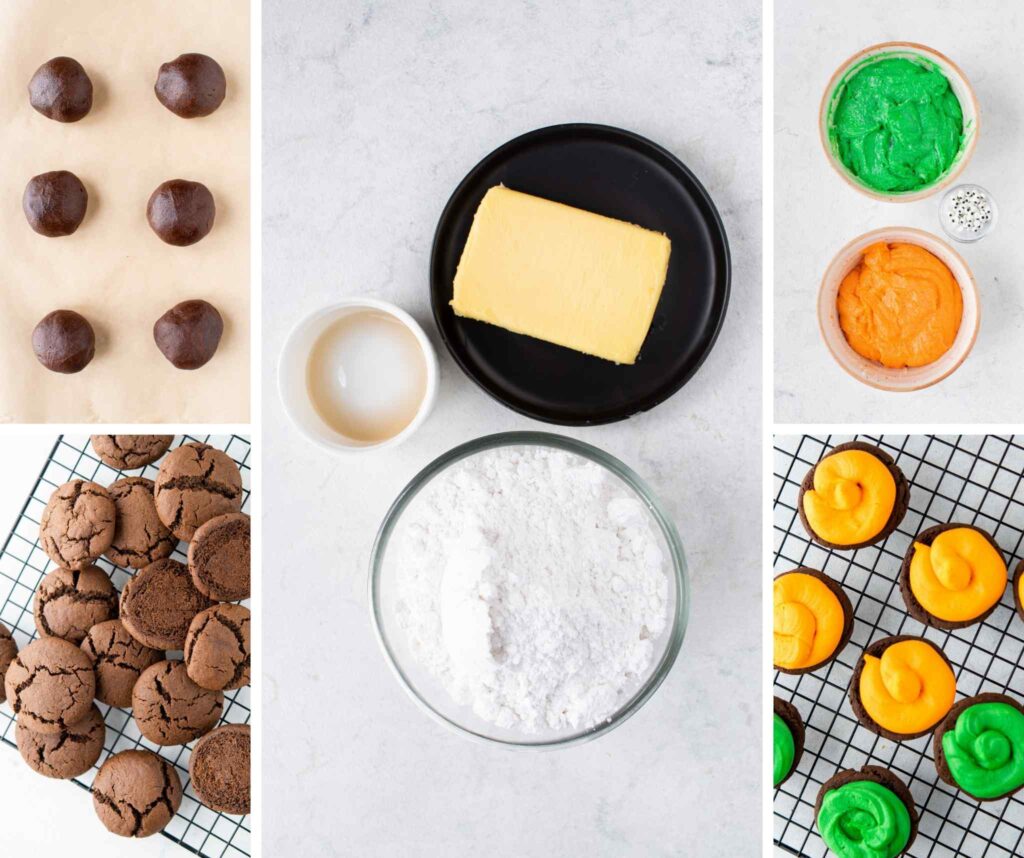
Preheat the oven and prepare the cookie sheets - Preheat your oven to 350º F and line your cookie sheet with parchment paper and set it aside.
Mix the dry ingredients - Combine the all-purpose flour, baking soda, baking powder, cocoa powder, and salt in a large bowl and set it aside until ready to use.
Combine the wet ingredients - In a stand mixer (you can also use the hand mixer for this) add the softened butter, both the granulated and brown sugars, egg, vanilla extract, and the milk together.
Beat the mixture at medium speed, scraping down the sides and beating for at least 2-3 min or until the mixture is creamy and everything is incorporated well.
Mix in the dry ingredients - Add the flour mixture to the butter mixture in batches and mix till the dough is formed.
Chill the dough - Cover the dough and refrigerate for at least an hour. This will create cute puffy tops for these cookies. Skipping this step will create flat cookies that will spread.
Once chilled, scoop out about 1 ½ to 2 tablespoon of dough (or use a #40 cookie scoop) and roll it in between your palms giving it a round shape. Place the balls of cookie dough 2 inches apart on the prepared baking tray and bake for at least 14 - 15 minutes.
Cool the chocolate sandwich cookies - Let the cookies cool for 5 minutes in the baking tray before transferring them to a wire rack to cool completely.

How to Make Buttercream Filling for Sandwich Cookies
Cream the ingredients together - In a bowl of a stand mixer or using a hand mixer, cream the softened butter until it's light and creamy.
Add vanilla extract and powdered sugar (in batches) and beat until you get a smooth and fluffy consistency (4-5 min).
Divide and color the buttercream - Divide the buttercream into two equal parts and tint one with orange and the other with green gel food color. Or, choose any color you wish for your monster cookies filling.
Assemble the Halloween Monster Cookies
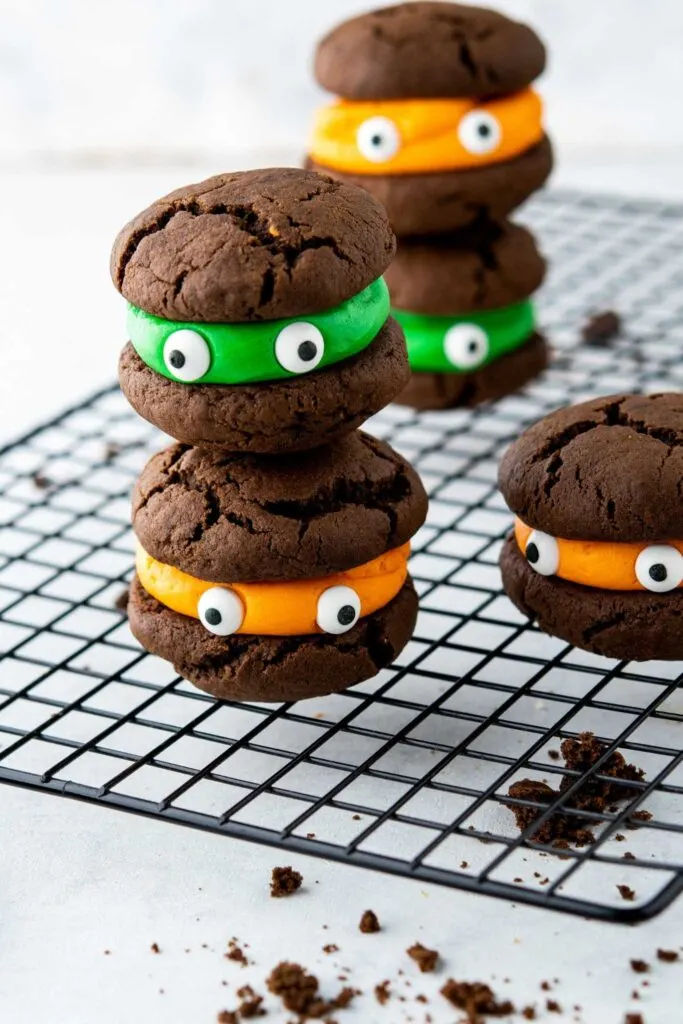
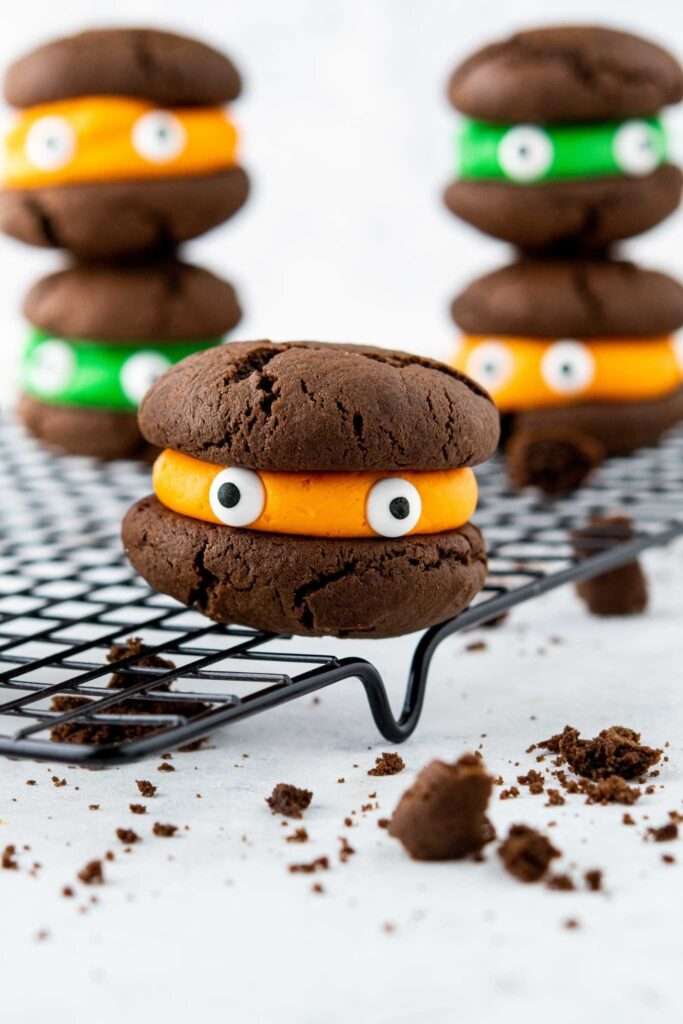
Fill the piping bags - Fill both the frostings in piping bags with the colored buttercream fitted with a large rounded tip or just cut off the tip of the bag. Flip the sandwich cookie upside down and frost the base of the cookie.
Place the flat side of another cookie on top of the frosted cookie and press gently. Stick two eye candies in front for the spookiness!
Store in an airtight container until ready to serve!

Tips for Making These Easy Halloween Cookies
- You can store these EASY HALLOWEEN COOKIES in an airtight container for 1-2 days at room temperature or 4-5 days in the refrigerator. You can also store the extra frosting in the fridge for 4-5 days; allow it to come to room temperature before using it again.
- Adjust the intensity of the colors till you get desired bright shade in the frosting. I prefer using gel food color as just a little quantity of it is enough to get a bright shade; if you use liquid food color then you might have to use tons of it to get the bright shade and that will just make your frosting taste weird.
- You can beat in 1-2 tablespoon of milk in the frosting if you feel it’s too thick.


📖 Recipe

Easy Halloween Cookies
These Easy Halloween Cookies are delicious with brightly colored buttercream sandwiched between chunky chocolate cookies and with eye candies on front; I mean who can resist them?
Ingredients
Sandwich Cookies
- ½ cup Unsalted Butter, softened
- ¾ cup Granulated sugar
- ¼ cup Brown sugar
- 1 ½ cups All-purpose flour
- 1 teaspoon Baking soda
- ½ teaspoon Baking powder
- ½ cup Cocoa Powder
- ¼ teaspoon Salt
- 1 Egg
- 1 teaspoon Vanilla extract
- 2 tablespoons Milk
FROSTING
- 2 cups Unsalted Butter, softened
- 5 cups Powdered Sugar
- 1 tablespoon Vanilla Extract
- Orange and green gel food colors (or any other colors of your choice)
- Eye candies
Instructions
- Preheat your oven to 350º F and line your cookie sheet with parchment paper and set it aside.
- Combine the all-purpose flour, baking soda, baking powder, cocoa powder, and salt in a large bowl and set it aside until ready to use.
- In a stand mixer (you can also use the hand mixer for this) add the softened butter, both the granulated and brown sugars, egg, vanilla extract, and the milk together.
- Beat the mixture at medium speed, scraping down the sides and beating for at least 2-3 min or until the mixture is creamy and everything is incorporated well.
- Add the flour mixture to the butter mixture in batches and mix till the dough is formed.
- Cover the dough and refrigerate for at least an hour. This will create cute puffy tops for these cookies. Skipping this step will create flat cookies that will spread.
- Once chilled, scoop out about 1 ½ to 2 tablespoon of dough (or use a #40 cookie scoop) and roll it in between your palms giving it a round shape.
- Place the balls of cookie dough 2 inches apart on the prepared baking tray and bake for at least 14 - 15 minutes.
- Let the cookies cool for 5 minutes in the baking tray before transferring them to a wire rack to cool completely.
How to Make Buttercream Filling for Sandwich Cookies
- Cream the ingredients together - In a bowl of a stand mixer or using a hand mixer, cream the softened butter until it's light and creamy.
- Add vanilla extract and powdered sugar (in batches) and beat until you get a smooth and fluffy consistency (4-5 min).
- Divide the buttercream into two equal parts and tint one with orange and the other with green gel food color. Or, choose any color you wish for your monster cookies filling.
Assemble the Halloween Monster Cookies
- Fill the piping bags - Fill both the frostings in piping bags with the colored buttercream fitted with a large rounded tip or just cut off the tip of the bag. Flip the sandwich cookie upside down and frost the base of the cookie.
- Place the flat side of another cookie on top of the frosted cookie and press gently. Stick two eye candies in front for the spookiness!
- Store in an airtight container until ready to serve!
Notes
- You can store these EASY HALLOWEEN COOKIES in an airtight container for 1-2 days at room temperature or 4-5 days in the refrigerator. You can also store the extra frosting in the fridge for 4-5 days; allow it to come to room temperature before using it again.
- Adjust the intensity of the colors till you get desired bright shade in the frosting. I prefer using gel food color as just a little quantity of it is enough to get a bright shade; if you use liquid food color then you might have to use tons of it to get the bright shade and that will just make your frosting taste weird.
- You can beat in 1-2 tablespoon of milk in the frosting if you feel it’s too thick.
Recommended Products
As an Amazon Associate and member of other affiliate programs, I earn from qualifying purchases.

Christine Day
Monday 8th of August 2022
This looks really good. Please send me the website thank you
Mary
Friday 5th of August 2022
Adorable cookies. Now I just need some kiddos to make them for.
Jules
Friday 5th of August 2022
I’m so inspired by these cookies they are so freakin cute!!! Perfect for Halloween!